by Jim McGee
Most of us use our boats not just for sailing but also as waterfront vacation homes. Builders have recognized this and today nearly every boat over 27 feet comes with dockside hook ups for at least water and electricity. Larger boats typically feature dockside cable TV hookups.
Dockside telephone hookups, once a popular option, have become significantly less important with the popularity of cell phones. It's hard to imagine a marina in the US today where you'd be unable to get a cellular signal.
But if your boat is more than seven years old you may find it lacking dockside connections. Installing dockside utilities isn't difficult but it is time consuming. This article is an example of the installation of dockside water and cable service on a late model Catalina 30. The details will differ from boat to boat but the basics will be the same. Most late model boats large enough to live aboard already come equipped with dockside electric.
What You'll Need
|
|
First you'll want to confirm that the water at your slip is potable water. That means the water is coming from a source known to be fit for human consumption and that the proper grade of lines are used to get that water to your slip. They're rare today but some small marinas consider dockside water to be a convenience for washing your boat and no more.
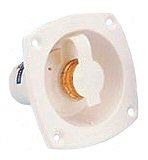
The inlet you'll install into your transom must include a backflow valve. This prevents any water from your onboard system, which may be contaminated, from flowing back into the marina's water lines and contaminating water systems of adjacent boats. The inlet should also include a water pressure regulator. Water pressure at some marinas is high enough to cause damage to your water pump or even to cause your lines to burst - potentially sinking your boat at the dock. This is why you will also need a way to turn the water off whenever you leave the boat. A burst line or fitting will have water entering your boat faster than your bilge pump can pump it back out.
Surflo makes a unit with a 50psi regulator, but that's a little on the high side, so I opted for the 35psi regulator & through hull from Jabsco. It reduces the water pressure coming in from the marina by up to 100psi and guarantees a steady 35psi water pressure despite fluctuations in marina water pressure. Figure you'll pay $40 to $45 for this unit at most marine stores.
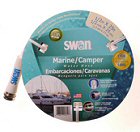
To connect your boat to the marina's water supply you need a good quality marine grade hose so it will stand up to the weather and to UV. Make sure that the hose is rated for use with drinking water - a garden hose won't do. Your best bet is your local home center. Look for hose labeled Marine/Camper hose. It will be white with a blue stripe. Expect to pay around $12 for a 25 foot hose or a few dollars less than the same hose at your marine store.
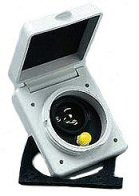
Marinco makes through hulls for Cable TV and TV/phone combinations. The cost is about the same $100 for the Cable TV inlet and $108 for the combined unit. I was unable to find the TV only inlet on the shelf. Since I'm unlikely to ever use the phone jack I may pop it out and use the inlet for some other use down the road.
|
|
The Installation
The hardest part of this project is cutting those big holes in your transom it will definitely put a lump in your throat!
You'll want to bring your utilities in on the same side as your dockside electric hookup. That way you can keep all your connections neat and tidy. I use several velcro strips to tie all my dockside utilities together (electric, water, cable TV), and to secure them to the stern rail. That way if I'm heading out for a day sail it's easy to unhook and reconnect when I return. Marinco makes a sleeve that allows you to coil everything together permanantly.
Locate the water inlet below the cable. That way if the connection leaks you're not bathing your cable connection in water.
You need to make sure there is room on the back side of the bulkhead to run your water hose and RF cable. Before cutting into anything make sure there is no electrical wiring in the way and that you won't be cutting into any structural elements. If your boat has the backstays attached in this area do not cut in the area adjacent to the backstay attachments. You do not want to weaken the structure near these critical points.
 On
the Catalina 30 the back side of the stern bulkhead is the inside of the
starboard cockpit locker. A chase at the bottom of the locker feeds the
deck shower and the vent hose for the bilge blower. Wiring is brought
through both the lower chase and the upper corner of the locker to power
the stern light.
On
the Catalina 30 the back side of the stern bulkhead is the inside of the
starboard cockpit locker. A chase at the bottom of the locker feeds the
deck shower and the vent hose for the bilge blower. Wiring is brought
through both the lower chase and the upper corner of the locker to power
the stern light.
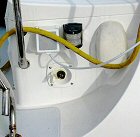
The photo to the right is looking down into the locker. The Cable TV inlet requires drilling 1½ and ¾ inch holes. Clean up the edges with a little 60 grit sandpaper. If there is a wood core coat the inside of the hole with a little 3M 4200 on your finger or with a thin coat of epoxy to prevent water from reaching the core.
Since the right side bolts were not long enough to thread through the thicker bulkhead on that side I discarded the gasket included with the cable inlet and bedded it in 3M 4200. The combination of the two bolts on the left side and 4200 have held up nicely after one season and there has been no movement of the inlet.
Next locate where you want to position your water inlet and mark the center with a pencil. With a small bit drill a pilot hole on your mark. Now break out that big 2½ hole saw that you had to buy just for this job. Center the bit of the hole saw on your pilot hole and guide the saw into the cut. As the teeth make contact with the gel coat reverse the drill and score teh gel coat with the hole saw running in reverse. This will prevent gelcoat chipping. Flip the drill back to forward and resume your cut.
Resist the temptation to push on the saw which will overheat the bit and dull the teeth. Instead let the saw do the work, occasionally back it out to let the chips clear the hole. The aft bulkhead on most boats is quite thick and may be cored with plywood. You can make this cut with a jig saw but you'll get a much cleaner job with a hole saw. No sharp edges on the cut means less chance of gelcoat cracks later on.
When you've cut through clean up the edges with some 60 grit sandpaper then, if there is a wood or plywood core coat the inside of the hole with a little 4200 on your finger or a thin coating of epoxy. Bed the inlet valve in 4200 and install.
From the back of the Cable TV inlet I used a standard 50 foot coaxial cable from the home center. The cable was run tightly around the upper lip of the locker and attached with zip tie anchors. On my boat the cable enters the cabin behind some trim work in the aft bunk. This is where the job gets interesting.
 Fishing
cable in boats is never fun and the thick end on the coaxial cable pretty
much guarantees the cable will not fish easily through existing cable
runs. That means drilling access holes. It's a time consuming process as
you'll be drilling directly adjacent to other electrical and electronics
cables on your boat. But it's also one of those jobs that can't be rushed.
Take you time.
Fishing
cable in boats is never fun and the thick end on the coaxial cable pretty
much guarantees the cable will not fish easily through existing cable
runs. That means drilling access holes. It's a time consuming process as
you'll be drilling directly adjacent to other electrical and electronics
cables on your boat. But it's also one of those jobs that can't be rushed.
Take you time.
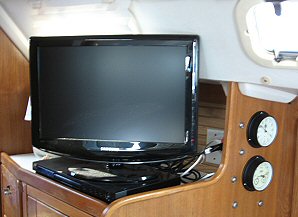
After fishing the coax behind all the trim and lockers on the starboard side of the boat I removed the wall section above the hanging locker and installed a coax outlet and mounting plate adjacent to the existing 110v outlet. With an outlet plate it looks like a factory installation (visible behind the TV in the photo). I then worked my way back aft, zip tying the cable in place as I went, either tying it back to existing cables or to adhesive cable tie anchors.
A standard 2 foot coax cable connects the TV to the wall jack, and a six foot cable from the stern to the outlet on the dock finished the connection. A smear of diaelectric grease on the outside connections completes the installation. Now I've got HD on board !
When all was said and done it took several hours to complete the cable installation. You may get lucky, but plan on at least a half day.
Water
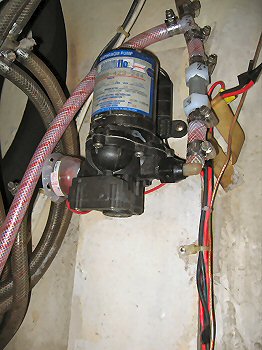
Next was the water installation. The first job is to locate your on board water pump. Just turn on
power to the pump let the faucet run and follow the sound until you locate
the pump. Now you need to figure out how you're going to run a hose
through the bilge back to the inlet location. Once you've figured out the
path you can calculate how
much hose you're going to need. Buy at least 10 feet more hose than you
think you'll need as you'll be going up, over and around obstructions.
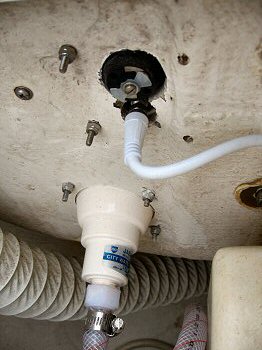
Only use ½ inch reinforced hose rated for drinking water (visible in the
photo of the inlet above).
On my boat the water pump is located just forward of the galley under the port settee. Fishing the water line to the pump was again time consuming but not difficult. With the cushions and access panels removed from the aft berth I fed the water line down the chase in the cockpit locker into the bilge until I could grab the hose from inside the aft berth. Pulling it through and crossing to the port side I was able to remove the cabinet drawers in the galley and feed it under the cabin sole until I could see it under the galley sink. From here I was able to pull it through to the pump.
|
The new hose from the dockside inlet T's into the line on the outlet side of the pump. A check valve is plumbed in to prevent pressurized water from damaging the pump. |
All hoses are secured with hose clamps over barbed fittings. You MUST use barbed fittings otherwise the working of the hose against the fitting from the motion of the boat will eventually cause the hose to pop off, potentially flooding or even sinking your boat. A good set of side cutters will work for cutting the water hose and are easier to use in a confined space than a knife.
Getting new, stiff hose over barbed fittings can be a chore. The trick is a little dish soap rubbed on the barb to allow the hose to slip on easily. The soap will evaporate leaving a nice tight fitting, and any small amount that gets into the water stream will be washed away. Never use oil or any petroleum based lubricants to install hoses used for drinking water.
The dockside water line should be plumbed to a T-fitting on the outlet side of the water pump. You'll need to plumb a check valve between the T-fitting and the pump outlet. The check valve protects the pump from the pressurized water coming from the dock. Make sure to use teflon tape when threading the barbed fittings into the check valve or you will have leaks. Don't overtighten your connections or the plastic fittings will crack.
Using Your New Connections
After you've connected your TV to the cable inlet turn it on and run it through it's setup procedure to make sure you have a clean signal. A fuzzy picture is usually caused by a poor connection or corrosion on the terminal at the dock. Make sure all your connections are tight. If the dockside connector is looking discolored spray it with some contact cleaner and gently clean it with a brass brush (available at Radio Shack and in the Electrical aisle of some home centers). A dab of dielectric grease on the threads in the spring and fall will keep moisture out of the connection and extend the life of your components.
Connect the hose from the water inlet to a Y-valve, and the Y-valve to the dock. The Y-valve allows you to hook up a separate hose for washing your boat. Make sure the water pump inside the boat is turned off and check your connections for leaks. Turn on the hot and cold water in the galley sink and check again. Now shut off the dockside water, open the cold water in the galley sink and start up the water pump. Again there should be no leaks. Turn the water pump off and the dockside water back on. You're now good to go. As an added caution check all the fittings again after 24 hours for any signs of seepage.
As an added convenience tie your electric cord, hose and coax cable together using a couple of Velcro strips. This makes keeps everything neat at the dock and makes it easy to connect/disconnect when you want to head out for a day sail. It also makes it easier to stow everything together if you're heading to an unfamiliar marina.
| Remember - you MUST turn off the
water at the dock anytime you are leaving your boat.
I watched salvage crews refloat a 60' cruiser in our marina. The owner never turned off the dockside water when he left the boat. When a hose burst the boat filled with water and sank at the dock. |